1. Product introduction:
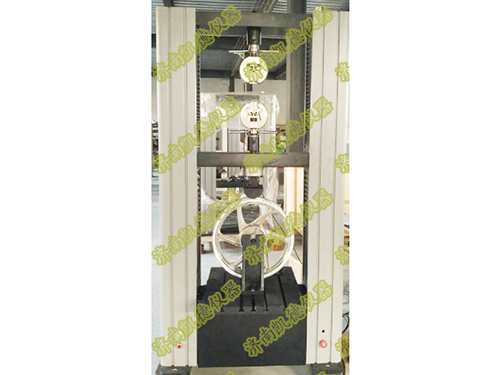
1. WDW-Y100 microcomputer-controlled motorcycle wheel static load performance and /mechanical performance comprehensive testing machine mainly uses the static load performance testing machine of the wheel and the mechanical performance test of the wheel.
2. The machine main unit for a spatial structure using double door, digital controller computer system, the rotational speed control system of the servo motor, through a reduction system by the reduction of precision ball screw drive beam moves up, down, complete Various mechanical performance tests such as sample compression.
3. This machine is widely used in the inspection and analysis of materials in industries such as automobiles and motorcycles, wheel manufacturing, building materials, aerospace, machinery manufacturing, wires and cables, rubber and plastics, textiles, home appliances, etc. It is a scientific research institution, colleges and universities, industrial and mining enterprises. Ideal testing equipment for departments such as.
4. Reference standards:
1) GB/T2243 5 -2008 Light alloy wheels for motorcycles and mopeds
2) GB/T 16491-2008 "Electronic Universal Testing Machine";
3) GB/T2611-2007 "General Technical Requirements for Testing Machines";
4) GB/T228.1-2010 "Tensile Test of Metallic Materials Part 1: Room Temperature Test Method";
5) GB/T6825.1-2002 "Inspection of Static Uniaxial Testing Machine Part 1: Inspection and Calibration of Force Measuring System of Tension and (or) Compression Testing Machine";
6) Applicable standards of this testing machine: GB, JIS, ISO, ASTM, DIN, etc.;
2. Main technical indicators:
1. Maximum test force: 100kN
2. Test force measurement range: 0.4%-100% (400N-100kN)
3. Test force indication accuracy: better than indication ±1%
4. Test power resolution: 1/300000 (the whole process is not divided into files or equivalent 6 files)
5. Measuring accuracy of beam displacement: resolution higher than 0.0025mm
6. Deformation measurement accuracy: ±0.5% (within the range of 0.2-10mm)
7. Test speed range: 0.01—500mm/min, stepless speed regulation
8. Speed control accuracy: ±1%(0.01-10mm/min); ±0.5%(10-500mm/min)
9. Constant force, constant deformation, constant displacement control range: 0.2%-100%FS
10. Constant force, constant deformation, constant displacement control accuracy:
Set value ; when set value ≥10%FS, within ±0.1% of set value
11. Deformation rate control accuracy: rate ; when rate ≥0.05%FS, it is within ±0.5% of the set value
12. Test space: A: Tensile space: 600mm B: Compressed space: 700mm C: Effective width: ≥550 mm
13. Extensometer (Beijing Steel Research Institute or imported from Epson, USA): 1
14. Pressure plate size: φ100mm: 1 set
15. Wedge-shaped metal tension clamp specific: 1 set
16. Flat jaw ( specification : 0 -7mm ): 1 pair
17. Round jaw ( specification : φ 4 -φ 9 mm ): 1 pair
18. Wheel static load performance aids: 1 set
1 9 . Optional accessories:
1 . 9 .1 circular jaw ( specifications: [Phi] of 9- [Phi] 14mm ); flat jaw ( specification :. 7 - 14m m ) of each pay 1
1 9 .2 Bending aids (rolling pitch: 300mm, roll width 100mm, roll diameter 30mm): 1 set
20 . Machine Power: single-phase 240V ± 10%, 50Hz, power: 2kW
21 . Work environment: temperature -35 ℃, relative humidity less than 80%
2 2 . Host size: 830 × 750 × 2000mm
2 . 3 . Weight: 600kg


